Ice Dams: Quick Fixes And A Reliable Cure
Ice dams are a major cause of home damage in cold-weather climates. They are humps of ice that forms at the edge of a roof under certain wintertime conditions. They can dump gallons of water into your walls, through your ceilings, and onto your floors. Insulation, drywall, furnishings, window treatments can all be damaged or destroyed. In addition, gutters and downspouts can be at risk.
What Causes Ice Dams?
Ice dams are usually caused by a combination of heavy snowfall, inadequate water-repellent protection and often, improper attic insulation or ventilation.
The flatter the pitch of the roof, the easier it is for an ice dam to get a grip. If snow and ice build up high enough in the gutters, they can provide a foundation for an ice dam. This process of thawing and refreezing is what causes an ice dam. Water builds up behind it, and finds its way into your home.
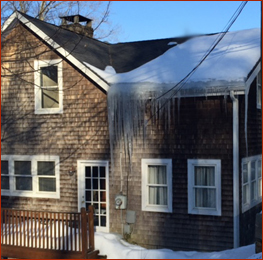
Ice dams are a common sight in Connecticut winters, and we have dealt with quite a few. There are several things you can do to avoid getting an ice dam or to reduce the risk of damage after one has formed, but there’s really only one cure: proper installation of ice and water shield.
A combination of better sealing, insulation, and venting in the attic and eaves helps, but will not solve the problem unless the water repellent barrier is installed in the right places.
What Damage do Ice Dams Cause?
If the ice dam breaks free, it can pull shingles and gutters off with it, and it can damage anything it falls on: whether that's cars, pets, and people or your landscaping.
If the roof sheathing stays wet, it can form mildew and start to rot, and mold can develop within your home from all the moisture that comes in.
Dealing with Existing Ice Dams
There are two avenues of attack: dealing with an existing ice dam and preventing them.
1. Remove the ice dam by breaking it free in small chucks. Do NOT use an ax or other sharp tool! You’ll cut through the shingles. Instead, tap lightly with a blunt mallet. This is slow, dangerous work, so it's probably a good idea to hire someone experienced to do this. Even if done safely, the chunks of ice can take pieces of your shingles with them.
2. Clear out gutters and downspouts. Again, this is ladder work and an easy way to damage either plastic or metal gutters and spouts.
3. Melt troughs through the ice dam with calcium chloride ice melter. Do NOT use rock salt! It will damage paint, metals, and plants beneath the eave and wherever the salty water drains.
Hint: A good trough-maker is a tube of cloth (a leg from an old pair of panty hose works well). Fill it with calcium chloride, tie off the top, and lay it vertically across the ice dam. It will slowly melt its way down through the dam, clearing a path for the underlying water to flow free.
Preventing Ice Dams
The Cure
The underlying problem is that when water melts, it can run inside your home. So you need to have ice and water shield applied generously. Secondly, keeping your roof cooler helps. A warm roof is caused by poor insulation and poor venting of the space under the roof.
The Clark Construction recommendations for preventing ice dams are:
1. Install ice and water shield as follows. Remove gutters and fascias. Apply ice and water shield behind the fascia and up onto the roof. Ice and water shield is 3' wide, so approx. 24" comes up onto the roof. Then apply an overlapping layer of ice and water shield, so that the water repellant material comes up between 4 1/2 feet to 5 ft onto the roo,. Lastly. reinstall the gutters and fascias.
Many contractors install ice and water shield 3' up, without wrapping it behind the fascia.That is NOT good enough.
2. Seal all points where warm air leaks from the living space into the spaces immediately below the roof sheathing.
3. Insulate the living space well to prevent conduction and convection of heat through the ceiling.
4. Vent the space between the insulation and the roof sheathing, so any heat that does leak through is carried away. This Old House has a good article about how to make improvements to help keep your roof the same temperature as the eves.
Note that just doing the sealing, insulating and venting is NOT a cure. You need to do the water repellant membrance, and do it right, as noted above. This ice dam cure will also cure a significant loss of heat from your home, saving you $$$ and your tighter home will feel more comfortable during these cold New England Winters.
WARNING! Performing ice dam removal is risking severe personal injury and damage to the roof if not done properly. Never walk on a snow covered roof and make sure if you are using a ladder that you follow the proper safety procedures. We highly suggest contacting professionals with the proper equipment and roofing experience to carry out this job.
Read more on Clark Construction's blog here.
Follow them on Facebook here.